Setting Up a Public VPS
Secure your new Linux VPS with this comprehensive guide covering essential hardening steps. Learn how to create non-privileged users, set up SSH key authentication, configure firewall rules with UFW, implement intrusion prevention with fail2ban, and enable automatic security updates - everything you need for a production-ready server.
Overview
There are many reasons you might need to have a public-facing server. You might want to host a website, run a game server, or just have a place to store your files. Whatever the reason, it's important to make sure your server is secure and configured correctly.
Since this comes up both for myself, or when I'm helping others, I thought it would be a good idea to document the steps I take to set up a new server. This guide will cover the basic steps you should take to secure and configure a new server, regardless of how you plan to use it.
TL;DR
In this guide, I'll cover the essential steps for hardening a new Linux VPS for public internet use. I'll walk through creating a non-privileged user with sudo access, setting up SSH key authentication, disabling root login, configuring a firewall with UFW, implementing intrusion prevention with fail2ban, and enabling automatic security updates. These steps provide a solid security baseline regardless of how you plan to use your server.
Heads up: This post contains some affiliate links. If you buy something through them, I might earn a small commission - at no extra cost to you. I only recommend tools I've actually used or vetted.
STEP 0: Finding a VPS Provider
When it comes to hosting a public VPS, you have numerous options ranging from budget-friendly providers to enterprise-grade cloud platforms. Here's a breakdown of your main options:
Budget-Friendly Options
RackNerd stands out as my personal recommendation for budget-conscious users who still need reliable performance. I've used them for years with excellent results, great service (typically respond in minutes), and their value proposition is hard to beat being sometimes 25% or less than the competition.
TIP: RackNerd runs "sales" year-round under different seasonal themes like Black Friday and New Year. Their prices are significantly lower than even Digital Ocean's basic droplets, with deals like 2.5GB RAM, 2vCPU, 40GB SSD, and 3TB transfer for just $18.93/year (about $1.57/month). You can track their current deals at racknerdtracker.com.
For most projects needing a solid foundation, I recommend this RackNerd plan which provides:
- 4GB RAM
- 3 vCPU cores
- 80GB SSD storage
- Debian or Ubuntu OS
Which as of May 2025 is $39.88/year, or about $3.32/month.
NOTE: If you want to use a different provider, I recommend looking for one that offers a free trial or a money-back guarantee. This way, you can test the service before committing to it.
Mid-Tier VPS Providers
These providers offer a good balance of affordability, features, and ease of use:
- Digital Ocean: Known for their "Droplets" with simple pricing and excellent documentation
- Linode (now Akamai): Consistent performance with competitive pricing
- Vultr: Similar to Digital Ocean with global data center options
- OVH: European provider with competitive pricing and good privacy practices
Enterprise Cloud Providers
For production workloads with scaling needs or specific compliance requirements:
- AWS EC2: The industry standard with the most features, but complex pricing
- Google Cloud Platform: Strong performance and integration with Google services
- Microsoft Azure: Excellent for organizations already using Microsoft products
- Oracle Cloud: Offers an attractive free tier with good performance
Cost Management Warning: The big cloud providers (AWS, GCP, Azure) offer incredible capabilities but can lead to surprise bills if you're not carefully managing resources and understanding their pricing models. Always set up billing alerts!
STEP 1: Connect to the Server
Before you can do anything, you need to connect to the server. You can do this using SSH, which is a secure way to connect to a remote server. You will need the IP address of the server, and the username and password you set up when you created the server.
Typically, you will be given a random-looking root account password. So, to Secure Shell (SSH) into the server, you can use the following command in your terminal:
1
ssh root@<IP_ADDRESS>
In present-day, this ssh command will be available in Windows (from PowerShell or from cmd.exe), macOS from the Terminal, and of course from Linux clients too. So, you don't need to install any software (like PuTTY) to connect to your server.
STEP 2: Create Non-Privileged User
It's considered a best practice to create a new user for yourself and disable the root user. This is because the root user has the ability to do anything on the system, and if you make a mistake, it could be catastrophic. By using a non-privileged user, you can still do everything you need to do, but if it would normally require root access, you have to use sudo to do it.
About Sudo: The
sudocommand allows you to run commands as the root user, but only for that command. This is a good way to prevent mistakes from causing too much damage.
Root Prompt: If you do want to "drop down" into a
rootshell, you can always usesudo -sorsudo -i.
- The
-sflag will give you a shell, but keep your environment variables.- The
-iflag will give you a shell, but as if you were the root user.
Create the Account
To create a new user, you can use the adduser command. This will create a new user and ask you for a password. You can also add the new user to the sudo group, which will allow them to run commands as the root user.
Sudoers: In this scenario, I'm suggesting to create an
operationsaccount, with a strong, unique password, and use that for all administrative tasks. If you work for a company or have a team, you should create a unique account for each person, ideally with Single Sign On (SSO), andsudoprivileges should be set up for specific things that user needs to do. As an example, if user John Doe (jdoe) only needs to be able to restart the Nginx web server and can also reboot the machine, then in the sudoers file you could have something like this:
That means that John Doe can run
sudo systemctl restart nginxandsudo rebootwithout being prompted for a password.I just wanted to be clear that there are relatively simple but powerful ways to manage users where they have enough privilege to do their job, but not enough to cause damage. This concept is called the Principle of Least Privilege.
Now, let's create a new user and add them to the sudo group:
1
2
3
4
5
# Create a new, non-privileged user
adduser operations

# Add the new user to the sudo group
usermod -aG sudo operations
TIP: When a user is added to the
sudogroup, then the/etc/sudoersfile defines what they can see, and if they will be prompted for their password. As a reference, here are the relevant lines from the/etc/sudoersfile:
It's not generally a good idea, but if you wanted to allow
sudowithout a password, you could add a line for that specific user, or change it for allsudogroup users by modifying that line to look like this:
Back to our server: as of now, we're still connected as the root user. Before we disconnect and reconnect as the new operations user, we need to set up SSH authentication.
STEP 3: Establish SSH Key Authentication
When you connect to a server using SSH, you can either use a password or a public/private key pair. Using a password is less secure because it can be guessed or brute-forced, but using a key pair is much more secure because it's nearly impossible to guess.
Generate SSH Key Pair
If you don't already have an SSH keypair, then you will need to generate one. How do do you know if you have one on your local workstation? You can check by looking in your ~/.ssh directory. If you see files named id_rsa and id_rsa.pub, then you already have a keypair. In Windows, the ~/.ssh directory is really just C:\Users\<USERNAME>\.ssh.
If you don't have a keypair, you can generate one using the ssh-keygen command, from your local workstation. You can use the default settings, or you can specify a different filename or passphrase. Here is a place to start:
1
2
# Create a high-strength Elliptic Curve Cryptography (ECC) keypair
ssh-keygen -t ed25519 -C "operations"
ECC vs RSA Keys: ECC keys are considered to be more secure than RSA keys, and they are also shorter. This means that they are faster to generate, faster to use, and more secure
You should now have two files in your ~/.ssh directory: id_ed25519 and id_ed25519.pub. The .pub file is your public key, and the other file is your private key. You should never share your private key with anyone, but you can share your public key if you'd like.
Copy Public Key to Server
Now that you have a keypair, you need to copy the public key to the server.
OPTION A: Copy and Paste
You can do this by copying the contents of the id_ed25519.pub file and pasting it into the /home/operations/.ssh/authorized_keys file on the server. You can do this by running the following command on the remote server:
1
2
3
4
5
6
7
8
# Create the destination directory
mkdir -p /home/operations/.ssh/

# Edit the `authorized_keys` file
nano /home/operations/.ssh/authorized_keys

# Paste the contents of the `id_ed25519.pub` file into the `authorized_keys` file
# Save and exit the editor after pasting the public key
OPTION B: Using ssh-copy-id
You can do this from your workstation using the ssh-copy-id command. This will copy the public key to the server and add it to the authorized_keys file in the ~/.ssh directory of the user you specify.
1
ssh-copy-id -i ~/.ssh/id_ed25519.pub operations@<IP_ADDRESS>
You will need to enter the password for the operations user, and then the public key will be copied to the server.
STEP 4: Review sudo privilege
Before we go on, we need to verify that the operations user has the correct sudo privileges. You can do this by running the following command, assuming you are still connected as root:
1
2
3
4
5
# Switch to the operations user
sudo -u operations /bin/bash

# Check the sudo privileges
sudo -l
This will list the commands that the operations user is allowed to run with sudo. You should see something like this:
1
2
3
4
5
6
Matching Defaults entries for robert on miniwin:
    env_reset, mail_badpass, secure_path=/usr/local/sbin\:/usr/local/bin\:/usr/sbin\:/usr/bin\:/sbin\:/bin\:/snap/bin,
    use_pty

User robert may run the following commands on miniwin:
    (ALL : ALL) ALL
STEP 5: Fix Color Prompts
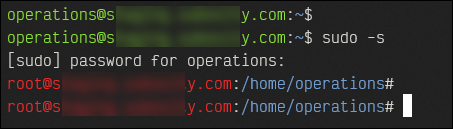
To make it easier to distinguish between the root user and the operations user, we can change the color of the prompt. We will make the prompt green for the operations user and red for the root user.
Before running this, be logged in as the
operationsuser. For a moment, switch to therootaccount by runningsudo -sso that you get the password prompt out of the way. Typeexitto return to theoperationsaccount and run this:
1
2
3
4
5
6
7
8
9
echo "[*] Show the full hostname in the prompt unprivileged prompt."
sed -i 's/\\h/$(hostname -f)/g' ~/.bashrc
source ~/.bashrc

echo "[*] Copy this file to /root/"
sudo cp ~/.bashrc /root/

echo "[*] Change the root prompt to be red."
sudo sed -i 's/01;32m/01;31m/g' /root/.bashrc
That will give you colored prompts like this:
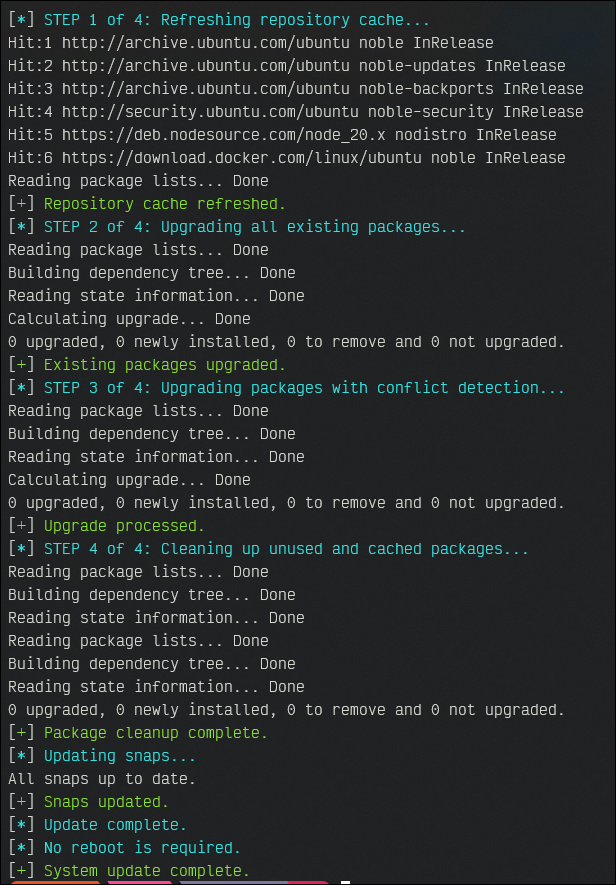
STEP 6: Install Basic Tools & update.sh
We will install some basic tools and create an update.sh script to keep the system updated.
1
2
apt update
apt install neofetch figlet net-tools htop -y
You can grab the update.sh script from here:
https://github.com/robertsinfosec/sysadmin-utils/blob/master/src/scripts/bash/update.sh
That will basically update apt, snaps, and flatpaks to the latest version and cleanup unused files related to the installers. You'll see an output like this from the script:
STEP 7: Harden SSH Configuration
Next, we will configure SSH to disallow root login and password authentication, and only allow SSH key authentication. To start, let's edit the config file:
1
sudo nano /etc/ssh/sshd_config
Login Banner
When you log in to a Linux machine, you often see a message that looks like this:
1
Welcome to Ubuntu 20.04.2 LTS (GNU/Linux 5.4.0-77-generic x86_64)
This is isn't particularly useful for regular users, but it is useful for attackers. So, it's a good idea to change this message to something more useful.
The banner alerts anyone accessing the system that unauthorized use is prohibited and that activities may be monitored - this can help support legal actions by demonstrating that users were informed of the system’s policies.
Instead of the OS version, you could put a warning message. This is done by modifying the /etc/issue file (for local logins) and /etc/issue.net (for network logins). Example content is here:
https://github.com/robertsinfosec/sysadmin-utils/blob/master/src/content/banner/issue.net
Usually you need to uncomment the line for Banner and change it to point to /etc/issue.net:
1
2
3
4
5
# Existing entry:
# Banner none

# Change it to:
Banner /etc/issue.net
and you should see the warning message before attempting to SSH into the machine.
Other SSHD Configuration
Here are some other settings you should consider changing in the /etc/ssh/sshd_config file. Change your file to match these settings:
1
2
3
4
5
6
7
8
9
10
11
12
# You cannot SSH in as root. You can ONLY SSH in as an unpriviliged user,
# then `sudo` or `su` to do administrative tasks.
PermitRootLogin no

# Do not allow password authentication. You must use SSH keys.
PasswordAuthentication no

# Allow only SSH key authentication
PubkeyAuthentication yes

# Disable X11 forwarding
ChallengeResponseAuthentication no
Finally, run the following to restart the SSH service:
1
sudo systemctl restart sshd
STEP 8: Install ufw Firewall
We will install and configure the Uncomplicated FireWall (UFW), or ufw firewall to allow ports 22, 80, and 443 by default.
1
2
3
4
5
6
7
8
9
10
11
12
13
14
15
sudo apt install ufw -y
# Reset in case there were any other rules in place.
sudo ufw reset
# By default, deny everything incoming
sudo ufw default deny incoming
# By default, allow everything outgoing
sudo ufw default allow outgoing

# EXCEPTIONS to the rule:
sudo ufw allow 22   # SSH
sudo ufw allow 80   # HTTP
sudo ufw allow 443  # HTTPS

# Turn on the rules.
sudo ufw enable
STEP 9: Install fail2ban IDS/IPS
We will install and configure an Intrusion Detection System / Intrusion Prevention System (IDS/IPS) fail2ban to protect against brute-force attacks. This works by monitoring log files for malicious activity. When certain thresholds are hit, then firewall rules are added temporarily to block the attacker.
1
sudo apt install fail2ban -y
It installs as not-started and not-enabled on boot, so make sure to set that:
1
2
systemctl enable fail2ban
systemctl start fail2ban
You can create your own "jails" for all kinds of services, but it comes with the SSH one installed and enabled by default.
To see the status of the "jails", you can use this script:
https://github.com/robertsinfosec/sysadmin-utils/blob/master/src/scripts/bash/all-jails.sh
Just download/copy that to the /root/all-jails.sh file, and mark it as executable chmod +x ./all-jails.sh. Then, when you run it, you'll see output like this:
1
2
3
4
5
6
7
8
9
10
11
1) Status for the jail: sshd
|- Filter
|  |- Currently failed: 2
|  |- Total failed:     15
|  `- File list:        /var/log/auth.log
`- Actions
   |- Currently banned: 2
   |- Total banned:     2
   `- Banned IP list:   92.255.85.37 92.255.85.107

13332 blocks in the past 24 hours.
STEP 10: Configure Unattended Upgrades
Lastly, we will configure unattended upgrades to automatically install security updates.
1
2
sudo apt install unattended-upgrades -y
sudo dpkg-reconfigure --priority=low unattended-upgrades
Enable unattended upgrades:
1
sudo systemctl enable unattended-upgrades
Conclusion
By following these steps, you will have a reasonably secure and well-configured server to start from. Remember to regularly update your server and review its security settings to ensure it remains secure. As a summarized, final checklist, here's what should be completed:
- You log in as
operationsvia SSH key. You can't SSH in asrootand you can't SSH in as any account with a password; only SSH keys are allowed. - When you do SSH in, you see a warning banner.
- Your
operationsaccount hassudoprivilege, and prompts for a password (run:sudo -l) - Your firewall is installed and enabled (run:
ufw status) - Your IDS/IPS is running (run:
all-jails.sh) - Unattended Upgrades is turned on for security updates, and you can run
update.shto manually update the system too. - You have different color prompts for unprivileged vs
rootuser.