Setting Up a GitHub Runner
Set up your own GitHub self-hosted runner and avoid GitHub Actions usage limits. This step-by-step guide shows you how to configure a runner as a systemd service on Ubuntu, properly containerize your builds, and automatically restart on reboot - perfect for hobbyists and small teams wanting unlimited build minutes.

Overview
In present day it's pretty common to use GitHub Actions to do your builds and deployments. However, for a hobbyist looking for a free solution, the free tier of GitHub Actions is limited to 2000 minutes per month. This is fine for small projects, but if you're doing a lot of builds or deployments, you might hit that limit.
A really great solution to this is that you can host your own GitHub Runner. This is a service that runs on your own server and can be used to run your GitHub Actions. This is a great solution for a hobbyist or small business that doesn't want to pay for a CI/CD service. Best of all, this can run on your home hardware and you don't need to poke any holes in your firewall. It works by your runner reaching out to GitHub and pulling down the build scripts to run. So, it's relatively secure and gives you "unlimited" build minutes because you're using your own hardware.
TL;DR
In this guide, I'll cover how to set up a GitHub self-hosted runner as a systemd service that automatically starts on boot. I'll walk you through creating a dedicated VM, installing Docker, configuring the GitHub runner script, and turning it into a proper daemon. You'll also discover how to properly containerize your builds to avoid conflicts and maintain a clean runner environment. Perfect for hobbyists and small teams who want to avoid GitHub Actions usage limits while keeping everything secure and automated.
What GitHub provides you is basically an interactive script that you would need to manually run every time your server reboots. So, my approach is to turn that into a systemd service, or daemon so that it runs automatically on boot. Here is a summary of how to do this:
- Ideally create a virtual machine in your ProxMox hypervisor. Since I typically run two of everything, I'll set up something like a
gitrunner1.lab.example.comon one ProxMox server andgitrunner2.lab.example.comon another, except the domain name would be for the domain name that I am supporting. - Prep the VM for service by generally following Setting Up a Public VPS. Even though this is a private service, you still want to secure it as much as possible, and it just takes a few minutes.
- Install Docker from the Official Docker Documentation.
- Run the Script from GitHub to establish your Runner.
- Turn the script into a systemd service.
Setting Up the VM
Assuming you have an Ubuntu Server instance and you've done some basic hardening, you can start by installing Docker. This is the only dependency that you need to run the GitHub Runner. From the Official Docker Documentation, you can basically run this whole block:
1
2
3
4
5
6
7
8
9
10
11
12
13
14
15
16
17
18
19
20
21
22
23
24
# STEP 1: Uninstall any potentially conflicting, old versions:
for pkg in docker.io docker-doc docker-compose docker-compose-v2 \
    podman-docker containerd runc; do sudo apt-get remove $pkg; done

# STEP 2: Setup Docker's `apt` repository:
# - Add Docker's official GPG key:
sudo apt-get update
sudo apt-get install ca-certificates curl
sudo install -m 0755 -d /etc/apt/keyrings
sudo curl -fsSL https://download.docker.com/linux/ubuntu/gpg -o /etc/apt/keyrings/docker.asc
sudo chmod a+r /etc/apt/keyrings/docker.asc

# - Add the repository to Apt sources:
echo \
  "deb [arch=$(dpkg --print-architecture) signed-by=/etc/apt/keyrings/docker.asc] \
  https://download.docker.com/linux/ubuntu \
  $(. /etc/os-release && echo "${UBUNTU_CODENAME:-$VERSION_CODENAME}") stable" | \
  sudo tee /etc/apt/sources.list.d/docker.list > /dev/null
sudo apt-get update

# STEP 3: Install Docker:

sudo apt-get install -y docker-ce docker-ce-cli containerd.io \
    docker-buildx-plugin docker-compose-plugin
Running the GitHub Runner Script
Navigate to your GitHub Repository or your Organization if you want the runner to be available to all repos in that organization:
For Organization Runners:
https://github.com/organizations/«ORG_NAME»/settings/actions/runners
For Repository Runners:
https://github.com/«ORG_NAME»/«REPO_NAME»/settings/actions/runners
From either of those screens, click "New self-hosted runner" and follow the instructions making sure to pick the right OS and architecture for your VM:
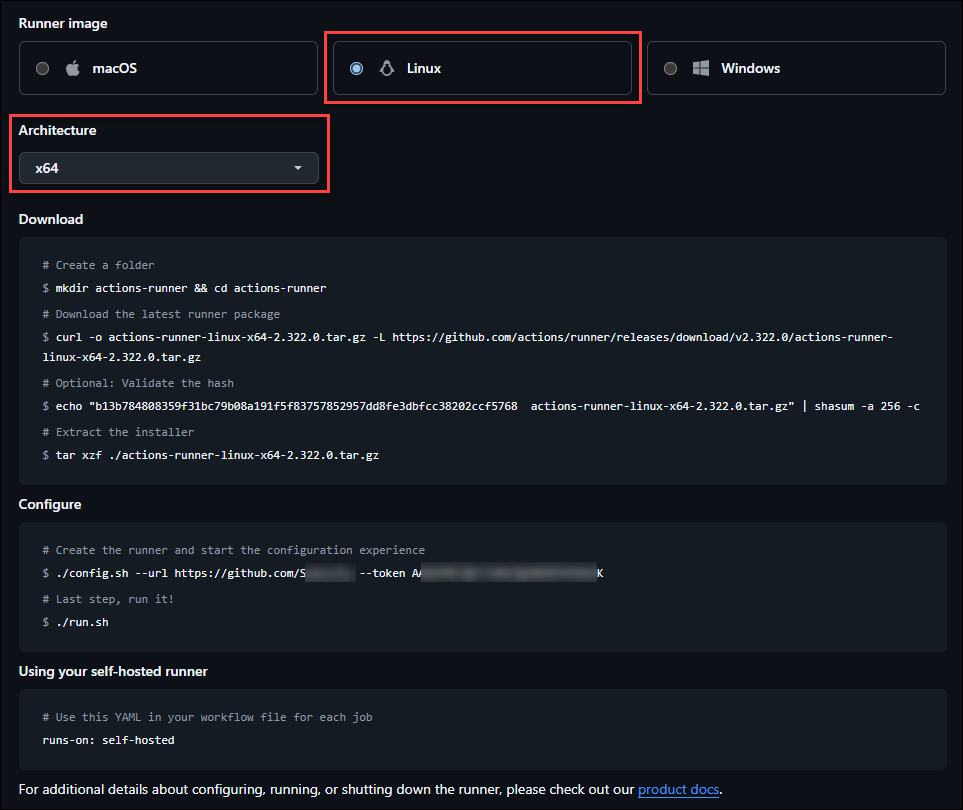
Turning the Runner Script into a Systemd Service
As you can see, it wants you to "start" your runner by running that ./run.sh script. That means every time your VM reboots, you would need to log in and run that script. That's not very efficient. So, let's turn that into a systemd service.
First, let's put the GitHub Runner content in a directory. I use:
1
2
3
4
5
# Make the directory
mkdir -p /opt/gitrunner

# Switch to that directory
cd /opt/gitrunner
Create service account
To make things simpler, we want to create a service account that will run the GitHub Runner. We want to set the ownership, recursively of the /opt/gitrunner directory to this user:
1
2
3
4
5
6
7
8
9
# Create the user
sudo adduser gitrunner

# Add the user to the `docker` group
sudo usermod -aG docker gitrunner

# Set the ownership of the directory where user `gitrunner` owns it,
# but anyone in the `docker` group can write to it too.
sudo chown -R gitrunner:docker /opt/gitrunner
Install the GitHub Runner Script and Create the Systemd Service
From that directory (e.g. /opt/gitrunner/) is where I run those code blocks from the "New self-hosted runner" screen. Note that we can take advantage of our service account to run the script. You want to prefix the ./run.sh script with sudo -u gitrunner to run it as the gitrunner user. So, your command will look something like this:
1
2
3
# Run the GitHub `config.sh` script as the `gitrunner` user account:
sudo -u gitrunner ./config.sh --url https://github.com/<MY_ORG> \
    --token uRJDM9YprFpBc6A36BjbGdBbT2HwE
Ultimately you should have your run.sh here:
/opt/gitrunner/actions-runner/run.sh
If so (or change according to your setup), let's create a Systemd Unit file here:
/etc/systemd/system/gitrunner.service
And the contents are:
1
2
3
4
5
6
7
8
9
10
11
12
13
[Unit]
Description=GitHub Actions Runner
After=network.target

[Service]
ExecStart=/opt/gitrunner/actions-runner/run.sh
User=gitrunner
WorkingDirectory=/opt/gitrunner/actions-runner/
Restart=always
RestartSec=10

[Install]
WantedBy=multi-user.target
To have Systemd recognize the new service, you need to reload the daemon:
1
sudo systemctl daemon-reload
Now, let's enable and start the service:
1
2
3
4
5
# Enable the service
sudo systemctl enable gitrunner

# Start the service
sudo systemctl start gitrunner
And that's it! Your GitHub Runner should now be running as a service on your VM. You can check the status with:
1
sudo systemctl status gitrunner
So what we've done is make so instead of "starting" your GitHub Runner by SSH'ing into your VM and running run.sh, it will start automatically on boot. You can start/stop/restart it with systemctl commands:
1
2
3
4
5
6
7
8
9
10
11
12
13
14
15
16
17
# Start the service
sudo systemctl start gitrunner

# Stop the service
sudo systemctl stop gitrunner

# Restart the service
sudo systemctl restart gitrunner

# Enable the service to start upon boot
sudo systemctl enable gitrunner

# Disable the service from starting upon boot
sudo systemctl disable gitrunner

# To check the current status of the service
sudo systemctl status gitrunner
If you followed all of that and started your service, you should now be able to go back to the GitHub web interface, refresh the page and see your runners available to take jobs. For example:
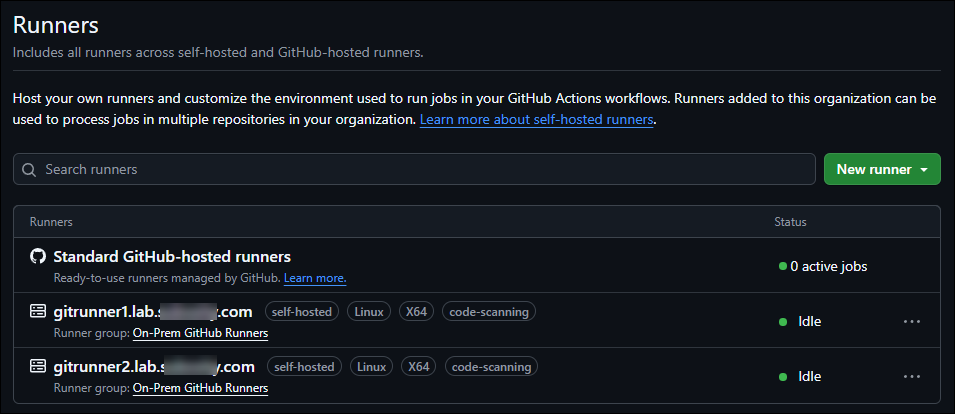
TIP: if you intend to use CodeQL, GitHub's Static Application Security Testing (SAST), then you can add the label of
code-scanningto your runner. This will allow it to take CodeQL jobs.
Using the Runner
Finally, as you saw in the documentation, in any GitHub Actions workflow, you can specify that you want to use a self-hosted runner. This is done by adding a runs-on key to your job. For example:
1
runs-on: self-hosted
WARNING - Containerized Builds
One important note here is that means that GitHub Action jobs will run directly on your VM, based out of that /opt/gitrunner/ folder. This can quickly become a significant problem because your build will often want to install some software. Well, another build may want to install a slightly different version of other conflicting software. To take all of that off the table, just do builds in a container. Usually, you can find a container image that already has your build tools, but if not, you can always just start from a base Ubuntu image for example, install your tools, do your build, and then dispose of the container.
How you do this is in addition to the runs-on designation in your GitHub Actions Workflow YAML, you can add a container attribute. For example:
1
2
3
4
5
jobs:
  build:
    name: Perform main build
    runs-on: self-hosted
    container: ubuntu:22.04
If you have the runs-on and the container set, then your GitHub Runner will spin up a new ubuntu:22.04 container, and run the rest of that job in that container. Conversely, if you just had runs-on and no container, like this:
1
2
3
4
jobs:
  build:
    name: Perform main build
    runs-on: self-hosted
Then that means your build is running natively on your GitHub Runner host. When you apt install or npm install software, it's installing that software onto your Runner host - which again, can turn messy very fast. So, consider always using the container attribute as well to make your builds isolated, reproducible, and disposable.