OpenVMS on ProxMox
Run OpenVMS on Proxmox with this step-by-step guide for homelab enthusiasts. Learn how to import VMDK files from VSI's Community License, configure your VM properly, and access the system via SSH. Perfect for those interested in exploring this historic operating system known for its stability and security.
Overview
This post is for a very specific niche, but also just so I have it documented somewhere. In the world of midrange and mainframe computers, particularly from the Golden Age of computing in the 1970's and 1980's, there is OpenVMS. This operating system was originally developed by Digital Equipment Corporation (DEC) for their VAX minicomputers. OpenVMS is still in use today, particularly in the financial and healthcare sectors, and is known for its stability and security features. It's also known for its unique command line interface and file system.
TL;DR
In this guide, I'll cover how to run OpenVMS on Proxmox using the free Community License from VSI. I'll walk through importing the VMDK files, configuring a virtual machine with the right settings, and accessing the system through the serial console and SSH. I'll also share some basic OpenVMS commands and a custom login script to make the environment more familiar if you're coming from Linux or other modern systems.
![]()
In modern day, OpenVMS is owned and supported by VMS Software Inc. (VSI), which continues to develop and maintain the operating system. VSI has made OpenVMS available on x86-64 hardware, which means it can run on modern servers and virtualization platforms. One such platform which isn't officially supported, but technically works - is ProxMox, an open-source virtualization platform that is based on KVM and LXC, and my hypervisor of choice!
The VSI Community License
VSI offers a free Community License for OpenVMS, which allows you to run OpenVMS on x86-64 hardware for non-production use. This is great for hobbyists, enthusiasts, and anyone who wants to learn more about OpenVMS without having to pay for a commercial license. You can find more information about the VSI Community License, and also apply here:
Within about a day I recieved an e-mail with how to download the .vmdk files, which is the only supported format. The .vmdk files are for VMware, but can be converted to .qcow2 for ProxMox. It is essentially a virtual hard disk that already has the operating system installed.
It's not officially documented, so this took some experimenting to get working, so this post will serve to document how I got it working.
Installation Steps
There are supported and documented platforms like VMWare ESXi and VirtualBox, but I wanted to see if I could get OpenVMS working on ProxMox. Here are the steps I took:
STEP 1: Download the OpenVMS VMDK Files & Upload to ProxMox
In the e-mail from VSI, there is a specialized link to download the .vmdk files for OpenVMS. Download the .zip file and then upload them to your ProxMox server. Inside of the .zip was really two files:
1
2
-rw-r--r-- 1 root root 8.0G Jan 17 09:22 community-flat.vmdk
-rw-r--r-- 1 root root  718 Jan 17 09:22 community.vmdk
However, if you look inside of that community.vmdk file (cat ./community.vmdk), you'll see that it's just a pointer to the community-flat.vmdk file, but with a different name: X86_V923-community-flat.vmdk
So, one thing you'll need to do is rename the community-flat.vmdk file to X86_V923-community-flat.vmdk:
1
mv community-flat.vmdk X86_V923-community-flat.vmdk
I used scp to upload the files to my ProxMox server:
1
scp .\community* [email protected]:/mnt/pve/SSD-x1A
Before moving on, the end-result is that I have the following files in place, on the ProxMox host:
1
2
/mnt/pve/SSD-x1A/openvms/community.vmdk
/mnt/pve/SSD-x1A/openvms/X86_V923-community-flat.vmdk
STEP 2: Create a Blank VM in ProxMox
We're going to "import" the operating system drive, so we just need a basic VM. We also are going to override most of this in the config file, so it doesn't need to be perfect. Basically, just create a VM and I'll reference it as VM ID 1003, going forward.
STEP 3: Import the VMDK File into VM ID 1003
We want to import the VMDK into the VM we just created, and specify the format as raw. So, given the variables above, for me it was this command line (from the ProxMox host):
1
qm importdisk 1003 /mnt/pve/SSD-x1A/openvms/community.vmdk SSD-x1A --format raw
Explanation of the command line:
qm importdiskis the command to import a disk into a VM1003is the VM ID/mnt/pve/SSD-x1A/openvms/community.vmdkis the path to the VMDK fileSSD-x1Ais the storage ID of where the imported drive will live--format rawspecifies the format of the disk
STEP 4: Edit the VM Config File
Instead of going through the ProxMox GUI, I just edited the config file directly, while SSH'ed into the ProxMox host.
1
nano /etc/pve/qemu-server/1003.conf
Here is what that file looks like, for a working setup. Please note that the UUID's should be unique:
1
2
3
4
5
6
7
8
9
10
11
12
13
14
15
16
17
18
args: -machine hpet=off
bios: ovmf
boot: order=scsi0
cores: 2
cpu: host
machine: q35
memory: 6144
meta: creation-qemu=9.0.2,ctime=1737127215
name: VMSTS1
net0: e1000=BC:24:11:9D:10:A5,bridge=vmbr0,firewall=1
numa: 0
ostype: other
scsi0: SSD-x1A:1003/vm-1003-disk-0.raw,iothread=1,size=8G
scsihw: virtio-scsi-single
serial0: socket
smbios1: uuid=2df32a97-3d8e-4113-a6a6-6e66c6be2eb4
sockets: 1
vmgenid: f5ba574e-e87a-4a83-bbcd-5037236bfddd
WARNING
Just a reminder that things like the MAC address in
net0,smbios1, andvmgenidshould be unique.
STEP 5: Start the VM
If you are used to other OSes like Linux or Windows Server, this is a little bit different. How this works is we are connecting to the virtual "serial port" of the server to see the initial boot output. Then, we can connect to the OpenVMS system via SSH or indirectly via the ProxMox host.
Within the ProxMox UI, click Start. Then, click on the Console tab to see the output. You should end up on a screen like this:
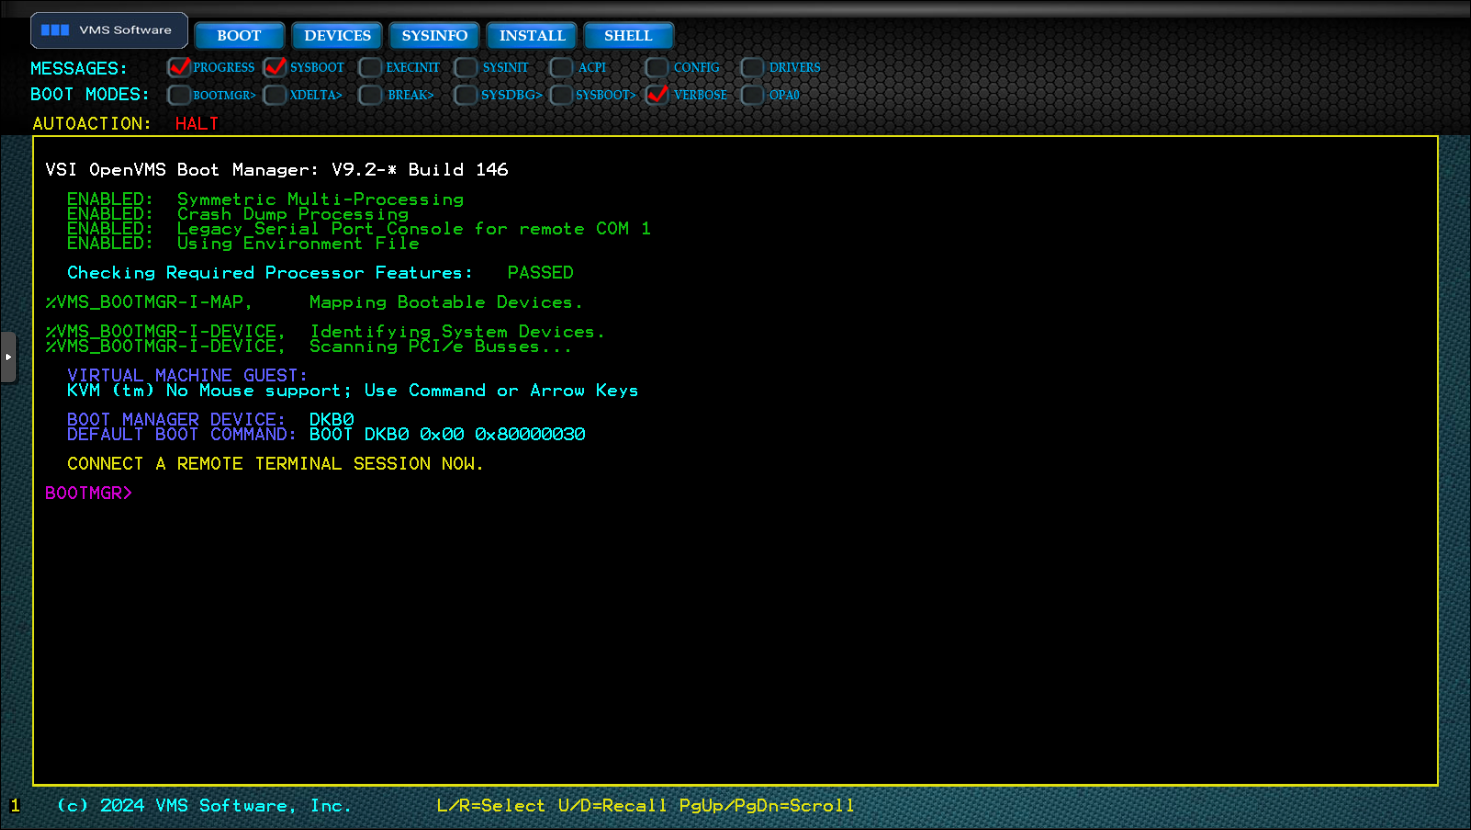
You can see in the middle area that DKB0 is the boot manager. So, from this BOOTMGR> prompt, you can type BOOT DKB0 and press Enter. You should see the system booting up for a moment and then land on this screen:
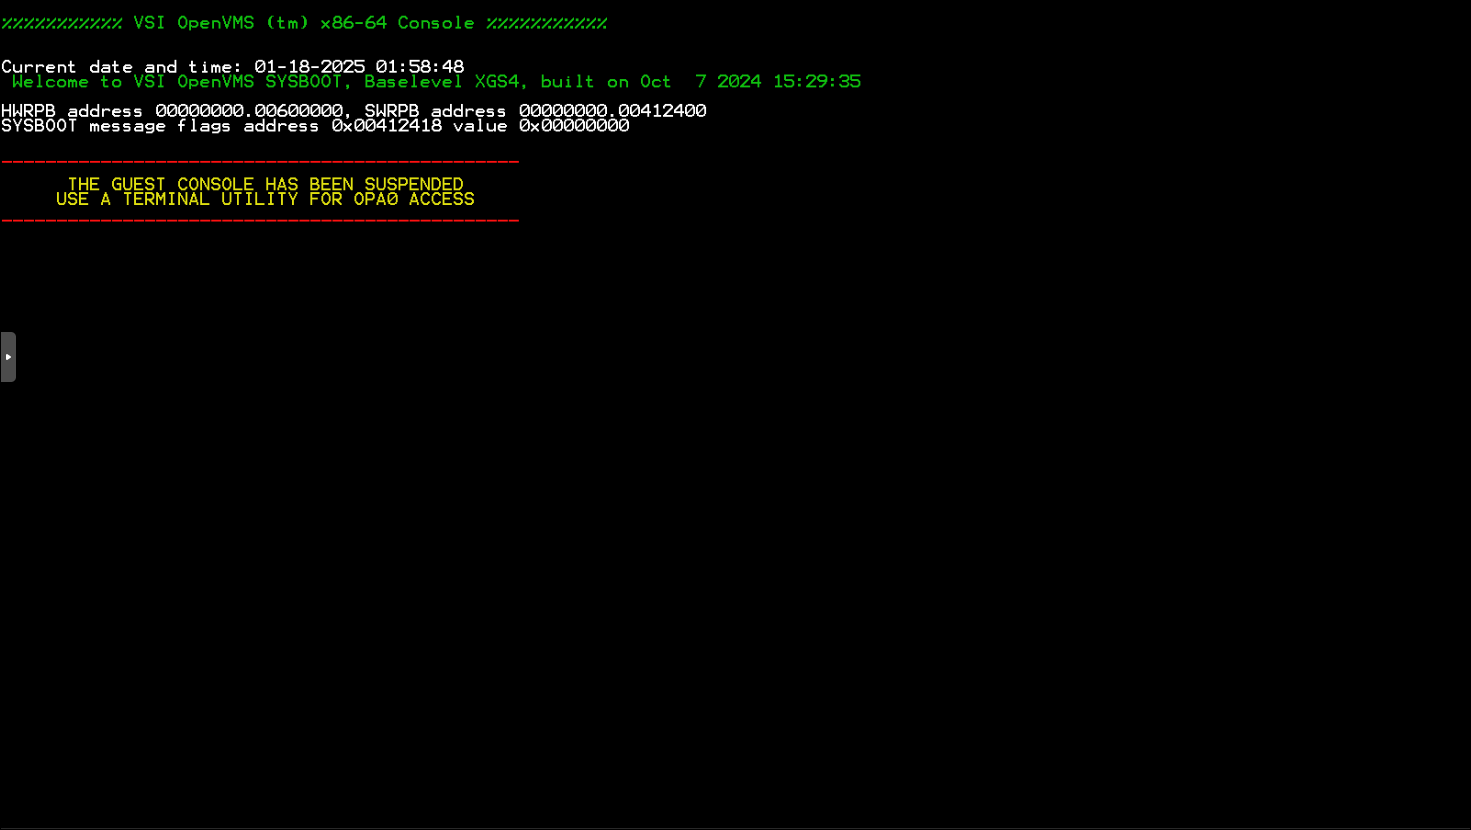
That's all we can do from the ProxMox console.
STEP 6: Connect to OpenVMS
There are two ways to get to a system prompt.
OPTION 1: The QEMU Terminal qm terminal 1003
While SSH'ed into ProxMox, this is the ProxMox command to connect to the virtual serial port of the VM. This is the most direct way to get to the system prompt. However, it's not the most user-friendly.
1
qm terminal 1003
To "escape" from the terminal, you can press Ctrl + ] or Ctrl + O and then press q and press Enter.
OPTION 2: SSH to the ProxMox Host
I mention this as #2 because:
- We may not easily be able to tell what the IP address is of the system, since it uses DHCP by default. When we are logged in, we can run
TCPIP SHOW INTERFACEto see the IP address, but before then we don't know. - On one setup, SSHD was enabled by default, but on another it was not. So, you may need to enable SSH.
Enabling SSH
As mentioned above, if SSH is not enabled, you will need to SSH into your proxmox server and use qm terminal 1003 to get to the OpenVMS system prompt.
Once you have a terminal open on the OpenVMS system, you should be sitting at a $ prompt. The default username is SYSTEM and the default password was provided in the e-mail that you received from VSI.
You should be able to see the status of the Secure Shell (SSH) service by running the following command:
1
$ TCPIP SHOW SERVICE
That should look something like this if SSH is disabled:
1
2
3
4
5
Service             Port  Proto    Process          Address            State

FTP                   21  TCP      TCPIP$FTP        0.0.0.0             Disabled
SSHD22                22  TCP      SSHD22           0.0.0.0             Disabled
TELNET                23  TCP      not defined      0.0.0.0             Enabled
To start/enable this service, you can run the following command:
1
$ TCPIP ENABLE SERVICE/PORT=22
Then, when you re-run TCPIP SHOW SERVICE, you should see that SSH is enabled:
1
2
3
4
5
Service             Port  Proto    Process          Address            State

FTP                   21  TCP      TCPIP$FTP        0.0.0.0             Disabled
SSHD22                22  TCP      SSHD22           0.0.0.0             Enabled
TELNET                23  TCP      not defined      0.0.0.0             Enabled
Now, if you couldn't before you should be able to SSH into the OpenVMS system. You can find the IP address by running the following command:
1
$ TCPIP SHOW INTERFACE
That results in something like:
1
2
3
4
Interface   IP_Addr         Network mask          Receive          Send     MTU

 IE0        192.168.20.180  255.255.255.0             398            48    1500
 LO0        127.0.0.1       255.0.0.0                  11            11    4096
This will show you the IP address of the system. You can now SSH into the system using the username SYSTEM and the password provided in the e-mail from VSI.
1
ssh [email protected]
But obviously your IP address will be different.
APPENDIX
Below are some additional commands and information that you may find useful when working with OpenVMS.
Additional Commands
With a barebones system up and running, here are some additional commands that you may find useful:
Show System Information
Shows system information.
1
2
3
4
5
6
7
8
$! Shows CPU information
$ SHOW CPU

$! Shows memory information
$ SHOW MEMORY

$! Shows resource usage
$ MONITOR SYSTEM
Show Disk Information
Shows all devices and disk devices.
1
2
3
4
5
$! Shows all devices
$ SHOW DEVICE

$! Shows all disk devices
$ SHOW DEVICE D
Show Network Information
Showing network information.
1
2
3
4
5
$! Show basic network information
$ TCPIP SHOW INTERFACE

$! Show all network services (like shown above)
$ TCPIP SHOW SERVICES
Show Running Processes
Shows processes that are running.
1
2
3
4
5
6
7
8
$! Shows basic process information for your current interactive process
$ SHOW PROCESS

$! Includes details about the process
$ SHOW PROCESS/ALL

$! Shows all processes running on the system, and include details
$ SHOW SYSTEM/ALL
Show Jobs
Shows all jobs you are running.
1
2
3
4
5
6
7
8
$! Shows basic queue information
$ SHOW QUEUE

$! Show batch jobs
$ SHOW QUEUE/ALL

$! Include job details
$ SHOW QUEUE/ALL/FULL
Show System Date
Shows the current system date and time.
1
$ SHOW TIME
Show Sizes as Bytes vs Blocks
By default, OpenVMS shows file sizes in blocks. You can append /UNIT=BYTES to many commands to show the size in bytes. Use /UNIT=BLOCKS to show the size in blocks.
Finding Help
Finding help on OpenVMS is a little different than other systems. You can use the HELP command to get help on commands and syntax.
1
2
3
4
5
6
7
8
$! Start by using basic help
$ HELP

$! Get help on a specific command
$ HELP <command>

$! Get help based on a topic (like "apropos" in Linux)
$ HELP HINTS
Defaults and Prompt
Lastly, a place to start to upgrade the default $ prompt to something more useful, and some aliases to make things easier, you can create a LOGIN.COM file in the SYS$LOGIN directory, that is, your home folder. Here is an example of what that file could look like:
1
2
3
4
5
6
7
8
9
10
11
12
13
14
15
16
17
18
19
20
21
22
23
24
25
26
27
$ LS :== "DIR"
$ LL :== "DIR/SIZE/DATE/OWNER"
$!
$ CD :== "SET DEFAULT"
$ DEFINE/PROCESS "~" SYS$LOGIN
$!
$ ADD_LOG_TO_FILE_OPERATIONS:
$!
$       BAC*KUP :=="BACKUP/LOG"
$       COPY    :=="COPY/LOG"
$       CP      :=="COPY/LOG"
$       DEL*ETE :=="DELETE/LOG"
$       RM      :=="DELETE/LOG"
$       PURGE   :=="PURGE/LOG"
$       MOVE    :=="RENAME/LOG"
$       MV      :=="RENAME/LOG"
$       REN*AME :=="RENAME/LOG"
$!
$ SET TERM/ANSI/INSERT
$
$! Dynamically set the prompt with hostname and username, removing spaces
$ NODENAME = F$EDIT(F$GETSYI("NODENAME"),"TRIM")     ! Trim extra spaces
$ USERNAME = F$EDIT(F$GETJPI("","USERNAME"),"TRIM")  ! Trim extra spaces
$ SET PROMPT="''NODENAME'_''USERNAME'> "
$
$ NANO :=="EDIT"
$ EXIT
This solves several "problems" for me:
- Instead of a
$prompt, it shows the hostname and username (e.g.X86923_SYSTEM>) - I can use
~to go to my home directory like in Linux (e.g.CD ~orSET DEFAULT ~) - I can use
LSandLLto list files and directories - I can use
cdto change directories - I can use
nanoto edit files. In reality, it's going to use the Eve/TPU editor, but this helps with muscle-memory is used to typingnano - For file operations (e.g. copy, delete, move, etc), by default, those commands don't show any output. So, appending the
/LOGwill make them default to showing output.
I also have this as a GitHub Gist, here, which I might continue to tweak as time goes on:
https://gist.github.com/robertsinfosec/373f8fd4dc0a999436a6eaea9d1e3a30
This is just a starting point, but it makes the system a little more user-friendly as you are getting used to it.
Documentation
The official documentation for OpenVMS is available on the VSI website. You can find it here:
For System Commands, start with the "Base OS" section on the left-hand navigation.