LetsEncrypt in your Homelab
Set up your own internal ACME server to issue trusted SSL certificates for your homelab without internet exposure. This comprehensive guide walks you through installing and configuring step-ca to create a private Certificate Authority compatible with LetsEncrypt tools, eliminating browser warnings and enabling seamless system-to-system communications.
Overview
One annoying aspect of setting up a homelab is what to do about SSL certificates. If you use self-signed certificates, then you have to deal with browser warnings. Also, many system-to-system services don't easily work with self-signed certs. So, what can be done?
TL;DR
In this guide, I'll cover how to set up your own internal ACME server to issue trusted SSL certificates for your homelab environment. I'll walk through installing step-ca, configuring it as a private Certificate Authority that's compatible with LetsEncrypt tools, and distributing root certificates to your devices. This approach eliminates browser warnings and enables seamless system-to-system communications without exposing anything to the internet or paying for certificates.
Background
For your internal network you can also use Let's Encrypt, but that requires a public domain and potentially port forwarding, etc. In fact, here's a quick summary of your options, when considering what to do with SSL certs in your homelab:
- Self-Signed Certificates: Easy to create, but browsers will show warnings. Also, many service-to-service integrations won't work with self-signed certs.
- Let's Encrypt: Free, but requires a public domain and port forwarding. Or if you use Traefik as a load balancer, you can use the DNS challenge with Cloudflare… assuming you are OK with using Cloudflare for DNS. This does work, but it's tedious.
- Wildcard Certificates: You can buy a wildcard certificate, but that's not free. Also, you must have a real, registered domain and you do need to renew the cert every year.
- Internal CA: You can create your own internal Certificate Authority (CA) and issue certificates to your services. This is the most flexible option, but it requires some setup. Meaning, you would SSH into a server and run a command to issue a certificate. Then, copy that certificate to your service. This is a very manual process, plus you have to configure all of your homelab machines to trust this Certificate Authority (CA).
There is another option though. For internet-facing systems you can use the Lets Encrypt service for free. Behind the scenes, Lets Encrypt uses the ACME protocol to issue certificates. Well, you can run your own ACME server in your homelab to issue certificates just like Lets Encrypt does. This is a great option if you want to issue certificates for internal services that are not internet-facing. There are many web servers and self-hosted services that support Lets Encrypt out of the box, so you can use the same tools and software that you would use with Lets Encrypt, but without the need for a public domain or port forwarding.
NOTE
What is being proposed here is running an
acmeserver which is compatible with LetsEncrypt technologies, likecertbot. These certificates will be self-signed, but you can and should download the root CA certificate and trust it on all of your machines. Put another way, you are going to "trust" the Certificate Authority of your ACME server, which will make it so all of your internal certificates seem to be legit.
What is LetsEncrypt?
LetsEncrypt is a free, automated, and open Certificate Authority. It is run by the Internet Security Research Group (ISRG). It uses the ACME protocol to issue certificates. The certificates are valid for 90 days and are trusted by all major browsers. Back in the olden days, you'd have to manually generate a CSR, send it to a CA, pay them, and then wait for them to send you back a certificate. You'd then move these two files (private key and public key/certificate) to a certain folder, configure your web server to point to them, and then restart your web server. This was an expensive, manual, time-consuming process.
![]()
The unintended consequence of this is that many websites wouldn't have SSL certificates and just have an HTTP website. This is bad for privacy and security. LetsEncrypt changed all of this by allowing anyone and everyone to not only get free SSL certificates, but offered a mechanism to completely automate the process. For example, after initially set up, the certificate is good for 90 days. So, you run a cron job that runs every week that runs certbot renew and if the certificate is within 30 days of expiring, it will renew it. For example:
# Run the certbot renew command every Sunday at 2:00am
0 2 * * 0 echo "----- Certbot Renew Run: $(date) -----" >> /root/certbot-renew.log \
          && certbot renew >> /root/certbot-renew.log 2>&1
Feel free to mess around on this site to play with different cron schedules. In particular, scroll to the bottom of the page and click "Examples".
This means that once-configured, you never have to think about SSL certificates again since they auto-update with a process that virtually never fails. You would run this cron job weekly because maybe there's an internet outage or something that causes the certificate to not renew. So, you want to give it several times (the 4 weeks of the 3rd month) to try to renew before it expires.
Why chose a local ACME instance?
It might seem like this is similar to using an internal CA (or just using openssl from the command-line). However, the significant difference here is that a LOT of software natively supports using LetsEncrypt, and specifically the ACME protocol. So, by setting up a local ACME instance, you can use the same software and tools that you would use with LetsEncrypt, but without the need for a public domain or port forwarding.
Below is how you can set that up.
STEP 1: Choose a Hostname & Create a User
Consider name like ca (aka Certificate Authority) or acme perhaps? Makes it obvious that this host provides CA services and/or supports the ACME protocol.
Next, create a user for the service who will be an unprivileged user and instead of having a regular home directory, the account will have /opt/step as its home directory. This user will not have the ability to log in locally. This account will only be used to run the step-ca service, or by impersonating this user to run commands.
PLEASE NOTE: For the duration of this post I will use the fictitious name
acme.lab.example.comas the hostname for the ACME server. Replace this with your own hostname.
Create an unprivileged user step
It's considered a best-practice not to run services as root. So, we will create a user named step to run the step-ca service. This user will have a home directory of /opt/step and will not have the ability to log in locally. The -m option creates the home directory and the -d option sets the home directory.
1
sudo useradd -m -d /opt/step step
The following steps (after installation) should be run as this user using something like this:
1
sudo -u step <command>
STEP 2: Install step-ca
Download the step and step-ca packages from the Smallstep website and install them.
1
2
3
4
5
6
7
8
9
10
11
12
13
# NOTE: Run as root or sudo
# Change to the /tmp folder
cd /tmp

# Download the installer package for `step`
wget https://dl.smallstep.com/cli/docs-ca-install/latest/step-cli_amd64.deb

# Download the installer package for `step-ca`
wget https://dl.smallstep.com/certificates/docs-ca-install/latest/step-ca_amd64.deb

# Install the packages
apt install ./step-cli_amd64.deb
apt install ./step-ca_amd64.deb
This will install the /usr/bin/step and /usr/bin/step-ca binaries.
STEP 3: Initialize step-ca
Once installed, you need to initialize your Certificate Authority. To do that you will run this command, as your unprivileged step account:
1
sudo -u step step ca init --ssh --acme --remote-management
What is:
sudoasstep?Above, we are using
sudoto run thestepcommand as thestepuser. Or, you can say we are impersonating thestepuser while running this command. The userstepand the commandstepare the same name, so it can be confusing. So, here is the syntax:
This is because the
stepuser is the designated, unprivileged user that should do anything related to this ACME service. This account otherwise does not have the ability to run commands asroot. This is a good security practice. Thestepuser will be able to run thestep-caservice, but not have the ability to do anything else on the system. Meaning, if this service is ever compromised by an attacker, they shouldn't easily have a path for privilege escalation to run things asroot.
This will prompt you for the following information:
- Deployment Type
- Name of the PKI
- What DNS names or IP addresses will clients use to reach your CA
- What IP and port will your new CA bind to? (:443 will bind to 0.0.0.0:443)
- What would you like to name the CA's first provisioner?
- Choose a password for your CA keys and first provisioner (leave empty to generated a password)
Then, it will output something like this:
1
2
3
4
5
6
7
8
9
10
11
12
13
14
Generating root certificate... done!
Generating intermediate certificate...
done!

✔ Root certificate: /opt/step/.step/certs/root_ca.crt
✔ Root private key: /opt/step/.step/secrets/root_ca_key
✔ Root fingerprint: bb73bd012e2e6fc25eea6fe2e5057e87ff93bae7974eb4680e0eb22b627fe846
✔ Intermediate certificate: /opt/step/.step/certs/intermediate_ca.crt
✔ Intermediate private key: /opt/step/.step/secrets/intermediate_ca_key
✔ Database folder: /opt/step/.step/db
✔ Default configuration: /opt/step/.step/config/defaults.json
✔ Certificate Authority configuration: /opt/step/.step/config/ca.json

Your PKI is ready to go. To generate certificates for individual services see 'step help ca'.
Enable the Service to be able to listen on port 443
By default, you need root equivalent access to have an application expose/open a port below port 1024. So that our unprivileged user step can bind to port 443, we need to give that binary the permission to do so, using setcap:
1
setcap 'cap_net_bind_service=+ep' /usr/bin/step-ca
That just needs to be run once as root or sudo. That gives the executable the privilege to open a port below 1024. Now, even if the step-ca service is running as the unprivileged step user, it can bind to port 443.
STEP 4: Start the CA Service
First, run the service manually, just for testing:
1
sudo -u step step-ca /opt/step/.step/config/ca.json
You should see output the ends like this:
1
2
...
2024/12/01 17:00:00 Serving HTTPS on :443 ...
You can test the endpoint in a browser with something like: https://acme.lab.example.com/acme/acme/directory and the output should be something like:
1
2
3
4
5
6
7
{
    "newNonce": "https://acme.lab.example.com/acme/acme/new-nonce",
    "newAccount": "https://acme.lab.example.com/acme/acme/new-account",
    "newOrder": "https://acme.lab.example.com/acme/acme/new-order",
    "revokeCert": "https://acme.lab.example.com/acme/acme/revoke-cert",
    "keyChange": "https://acme.lab.example.com/acme/acme/key-change"
}
Back at the command line, type Ctrl+C to stop the service.
Run as a Systemd Service
Now that we've validated that the service can run interactively, let's set up a systemd service to run the step-ca service. This will allow the service to start automatically when the system boots, and will also allow you to manage the service with systemctl.
First, let's create a service unit:
1
nano /etc/systemd/system/step-ca.service
In the file should be contents like this:
1
2
3
4
5
6
7
8
9
10
11
12
[Unit]
Description=step-ca service
After=network-online.target

[Service]
ExecStart=/usr/bin/step-ca --password-file /opt/step/.step/step-ca-password.env /opt/step/.step/config/ca.json
Restart=always
User=step
Group=step

[Install]
WantedBy=multi-user.target
Password File Permissions
The step-ca command will normally want to interactively prompt you for the password for the various private keys (from previous steps). Instead, we can use the --password-file option to point to a file that contains the password. This is a good practice for running services in a headless environment. In this case, I put it in the /opt/step/.step/step-ca-password.env file, which only the step user can read. Meaning, I ran this command:
1
2
chmod 700 /opt/step/.step/step-ca-password.env
chown step:step /opt/step/.step/step-ca-password.env
Then, in that file, I put the password that I used when I ran the step ca init command. This is a good practice for running services in a headless environment. This way, the service can start without needing to prompt for a password.
Enable and start the service
Mark the service as enabled (so it will start when the system boots) and start it. The daemon-reload tells systemd to reload its configuration files, which it will then find our new service unit:
1
2
3
sudo systemctl daemon-reload
sudo systemctl enable step-ca
sudo systemctl start step-ca
Check logs
To view the logs for the step-ca service and "follow", -f them (like tail -f), you can run:
1
sudo journalctl -u step-ca -f
Or if you just run systemctl status step-ca you should see something like this:
1
2
3
4
5
6
7
8
9
10
11
12
13
14
15
16
17
18
19
20
● step-ca.service - step-ca service
     Loaded: loaded (/etc/systemd/system/step-ca.service; enabled; preset: enabled)
     Active: active (running) since Mon 2025-01-06 20:03:59 UTC; 6s ago
   Main PID: 3031 (step-ca)
      Tasks: 9 (limit: 2319)
     Memory: 13.3M (peak: 13.6M)
        CPU: 77ms
     CGroup: /system.slice/step-ca.service
             └─3031 /usr/bin/step-ca --password-file /opt/step/.step/step-ca-password.env /opt/step/.step/config/ca.json

Jan 06 20:03:59 acme step-ca[3031]: 2025/01/06 20:03:59 Starting Smallstep CA/0.28.1 (linux/amd64)
Jan 06 20:03:59 acme step-ca[3031]: 2025/01/06 20:03:59 Documentation: https://u.step.sm/docs/ca
Jan 06 20:03:59 acme step-ca[3031]: 2025/01/06 20:03:59 Community Discord: https://u.step.sm/discord
Jan 06 20:03:59 acme step-ca[3031]: 2025/01/06 20:03:59 Config file: /opt/step/.step/config/ca.json
Jan 06 20:03:59 acme step-ca[3031]: 2025/01/06 20:03:59 The primary server URL is https://acme.lab.example.com
Jan 06 20:03:59 acme step-ca[3031]: 2025/01/06 20:03:59 Root certificates are available at https://acme.lab.example:443/roots.pem>
Jan 06 20:03:59 acme step-ca[3031]: 2025/01/06 20:03:59 X.509 Root Fingerprint: 37f991ce2bee96766942a0945ae7d351aebbd3d>
Jan 06 20:03:59 acme step-ca[3031]: 2025/01/06 20:03:59 SSH Host CA Key: ecdsa-sha2-nistp256 AAAAE2VjZHNhLXNoYTItbmlzdH>
Jan 06 20:03:59 acme step-ca[3031]: 2025/01/06 20:03:59 SSH User CA Key: ecdsa-sha2-nistp256 AAAAE2VjZHNhLXNoYTItbmlzdH>
Jan 06 20:03:59 acme step-ca[3031]: 2025/01/06 20:03:59 Serving HTTPS on :443 ...
Now, you should now be able to use this server with certbot or other step-based tools to issue certificates.
STEP 5: Issuing a Cert (Test)
There are several different ways to issue a certificate. See below for a few different examples.
OPTION 1: Using step
To issue a certificate from another machine in the same network, install step CLI or use certbot. For example, using step:
1
2
3
4
5
6
7
step ca certificate \
  my-service.lab.example.com \
  my-service.crt \
  my-service.key \
  --ca-url https://ca.lab.example.com \
  --fingerprint <YOUR_ROOT_CA_FINGERPRINT_HERE> \
  --provisioner acme
OPTION 2: Using certbot with Apache
If we have an apache2 web server installed. For example, you might have these packages installed:
1
2
3
4
5
6
7
8
# Install the Apache web server
sudo apt install apache2

# Install Certbot
sudo apt install certbot

# Install the Apache plugin for Certbot
sudo apt install python3-certbot-apache
See below for STEP 7: Trust the Root Certificate for how to trust the root CA certificate on your machine, and be sure to run that code.
Then, you can issue a certificate with Certbot for the Apache web server like this:
1
sudo certbot --apache --server https://acme.lab.example.com/acme/acme/directory
This is where it will detect your hostname configured in your /etc/apache2/sites-available/* files, just like the regular usage of certbot!
OPTION 3: Using certbot with nginx
If we have an nginx web server installed. For example, you might have these packages installed:
1
2
3
4
5
6
7
8
# Install the Apache web server
sudo apt install nginx

# Install Certbot
sudo apt install certbot

# Install the Apache plugin for Certbot
sudo apt install python3-certbot-nginx
Then, you can issue a certificate with Certbot for the Nginx web server like this:
1
sudo certbot --nginx --server https://acme.lab.example.com/acme/acme/directory
OPTION 4: Using certbot with certonly
Also, without Apache, here's an example of just getting a certificate for a single domain:
1
2
3
4
sudo certbot certonly \
  --server https://acme.lab.example.com/acme/acme/directory \
  --manual \
  -d my-service.lab.example.com
STEP 6: Configuring Certificate Lifetime
You might notice that by default, the leaf certificates expire in 24-hours. This is by design, however it is configurable. You can modify the config file file:
1
nano /opt/step/.step/config/ca.json
And it won't exist, but if you make your authority section look something like this:
1
2
3
4
5
6
7
8
        "authority": {
                "enableAdmin": true,
                "claims": {
                      "minTLSCertDuration": "24h",
                      "maxTLSCertDuration": "2160h",
                      "defaultTLSCertDuration": "2160h"
                }
        }
If you are wondering, 2160h is the same as 90 days, but if I used 90d as a string, the service failed saying it didn't know what it was. So, this will set the default certificate lifetime to 90 days. To have this take effect, restart the service:
1
sudo systemctl restart step-ca
Syntax Errors
You can then check for errors by running
sudo journalctl -u step-ca -f. I mention this because if you have an extra comma or a missing comma, that is enough to make the service not-start. It's very easy to miss a syntax error in a JSON file, so be sure to check the logs if you have issues.
STEP 7: Trust the Root Certificate
At this point you have a working ACME server that can issue certificates. However, we're still getting browser errors and server-to-server communication will show errors because the root CA is not trusted.
For machines to trust the certificates issued by your new CA, they must "trust" the root CA certificate. You’ll need to install or automate distribution of your root_ca.crt to each machine’s OS trust store. For example:
Ubuntu/Debian
Place the root CA in /usr/local/share/ca-certificates/ and run sudo update-ca-certificates. If you already use Ansible, then that would be the easiest way to distribute the root CA. Otherwise, to this manually, it would really just be a few steps:
- Use
scpto copy the root CA from your ACME machine, to your workstation. Ex:scp [email protected]:/opt/step/.step/certs/root_ca.crt ~/Downloads/(NOTE: the permissions are locked down on the/opt/step/folder, so you probably want to copy that root CA to a more accessible location). - Use
scpto copy the root CA from your workstation to each server. Ex:scp ~/Downloads/root_ca.crt [email protected]:/home/jdoeand then once SSH'ed into that machine,mv ~/root_ca.crt /usr/local/share/ca-certificates/and then runsudo update-ca-certificates.
Unfortunately, this is not easy to script because 1) your working with the CA, your workstation, and potentially multiple target machines and 2) there are certain permissions (or chmod/chwon) that you have to deal with on the source and destination servers to do it correctly. This approach is fine for one-off servers, but having Ansible or Puppet or Chef or SaltStack or whatever you use to manage your servers, do this for you is the best approach.
You could scriptify this a bit by pulling down the root CA on each server, trusting the certificate before you do other things. For example:
1
2
3
4
5
6
7
8
9
10
11
12
# Switch to the /tmp folder
cd /tmp

# Download the root CA certificate and ignore
# SSL errors (because we haven't trusted the cert yet!)
wget --no-check-certificate https://acme.lab.example.com/roots.pem

# Trust the root CA
sudo cp roots.pem /usr/local/share/ca-certificates/acme-ca-root.crt

# Update the CA store
sudo update-ca-certificates
Windows
Download the cert from: https://acme.lab.example.com/roots.pem. Use Group Policy or manually import into “Trusted Root Certification Authorities.” by launching certmgr.msc.

From there, you can right-click on "Trusted Root Certification Authorities" and choose "All Tasks -> Import" and then follow the wizard to import the root CA certificate.
macOS
Download the cert from: https://acme.lab.example.com/roots.pem. Import via Keychain Access.
STEP 8: (BONUS) Have ProxMox get certificates from your ACME CA
If you are running ProxMox in your homelab, you can now have it get certificates from your ACME CA. In the Proxmox web UI, in the "Datacenter" tree, then in the "ACME" section, you'll note that you can't add an additional ACME server in addition to LetsEncrypt. We have to do that from the command line. So, SSH into your Proxmox serve and run the following. Before you start, remember STEP 7: Trust the Root Certificate and make sure that the root CA is trusted on your Proxmox server:
1
2
3
4
5
6
7
8
9
10
11
12
13
14
15
16
# Switch to the /tmp folder
cd /tmp
# Download the root CA certificate
wget --no-check-certificate https://acme.lab.example.com/roots.pem
# Trust the root CA
sudo cp roots.pem /usr/local/share/ca-certificates/acme-ca-root.crt
# Update the CA store
sudo update-ca-certificates
# Now, we can add the new ACME server
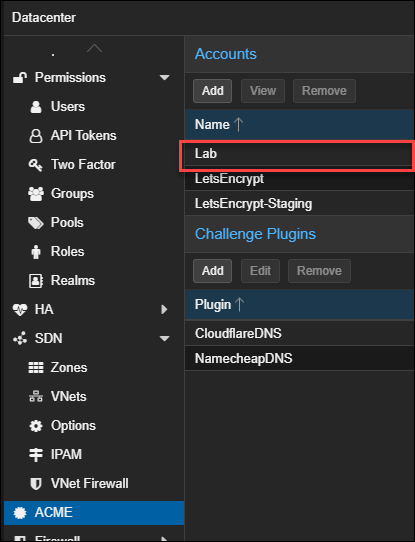
pvenode acme account register "Lab" [email protected] \
--directory https://acme.lab.example.com/acme/acme/directory \
--contact mailto:[email protected]
Refresh the web UI and you'll now see the "Lab" ACME server in the list:
You can now use this ACME server to issue certificates for your Proxmox server.
- Click on the Proxmox server in the left pane, under the Datacenter node.
- Click on the System -> Certificates section in the navigation.
- In the "ACME" section of that screen, click "Add". Choose "HTTP" and put in the hostname or alias of your Proxmox server. For example, I have the actual hostname of like
pve1.lab.example.comand also an alias ofproxmox.lab.example.com. You will need to have multiple entries for these. Click "Create" - In the "Using Account" section in the middle of the screen, make sure to choose "Lab".
- Click on a row, and then click "Order Certificates Now", and you will see the status.
When done, refresh the page and you'll see that the Proxmox server now has a certificate issued by your ACME server.
Summary
That’s it! You now have an internal ACME CA issuing certificates just like Let’s Encrypt does, except fully private to your homelab.
Appendix
Below are some additional resources that you might find helpful.
Automatic Certificate Management Environment (ACME) & RFC 8555
- RFC 8555 is the specification for the ACME protocol.
EFF's certbot
- Certbot is the most popular ACME client. This website shows how many software packages natively support
certbotfor their certificate management. - LetsEncrypt has a list of many other ACME clients that should work with it (and by extension, your local ACME server).